
WELLcome back! This week I’m sharing another standing balance posture: Tree Pose. In this lesson, the final position is set into the context of a longer routine.
Yoga balance postures:
- improve balance and stability.
- enhance proprioception.
- call upon present moment awareness.
- highlight the benefits of a focal point.
- strengthen legs, ankles, and feet.
- encourage growth mindset.
- build self-confidence.
This pose engages single leg balance skills. As such, students will benefit from a graduated approach and prompts that promote growth mindset. For beginners, I recommend using the entire Tree Pose Progression Routine. For older students or those with more experience, teachers may opt to move right from Step 6 to Step 13 or 16. Include prompts for relaxed breathing throughout this practice for all levels.
See bottom of post to download the mini poster.
Note: Self-comparison may become a deterrent, especially when students feel that their struggles are on display. Therefore, beginning with joint expectations and common language that underscore tolerance and acceptance helps establish a non-judgmental community. This lesson is a perfect time to introduce the phrase: “right for me today.” Students develop self-efficacy when they believe that with practice, they will improve.
Suggested script for introducing the common language: “right for me today.”
Sometimes, we look around and see that our classmates and friends can do things that we are still learning to do. In this case, we may feel envious or disappointed in ourselves. Other times, we may find that an activity seems easy, while others are still trying. In this case, we may feel bored or tempted to brag. In both situations, we base how we feel about ourselves on how we stack up against others. This is called comparison. When we allow comparison to do the talking, we wander from our own learning journey and may lose sight of our progress. We all have challenges; none of us are perfect. We all have strengths, but there is always more to learn. Every day we get a chance to try again. This is called persistence. When we let persistence do the talking, we stay focused on our goals and keep progress in our sights. In the face of a challenge, we do our best and feel proud of our effort. Each yoga pose that we learn will also present various levels of challenge. As you try each position, ask yourself, “Which feels right for me today?” When a position feels right, it does not feel easy. Instead, it is just enough challenge for your body today. As you settle into this position, remember that this is not your final destination. You are in control. Your journey continues as long as you choose to persist.
Tree Pose (Progression Routine)
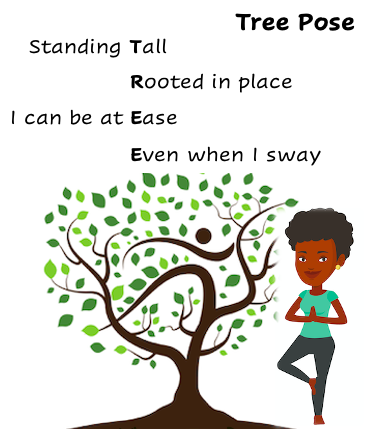
When introducing this pose, explain that you will move through a series of positions. Students may try each position but should return to the one that feels “right for you today.” Tell students to imagine they are a tree growing and changing. As a tree, you sway with the breeze while remaining grounded to the earth through your roots. Hence the poem and mantra, “I can be at ease, even when I sway.” Explain to students that these words represent some feelings and cues associated with this pose. Review the poem and ask students to consider how this relates to the practice of Tree Pose.
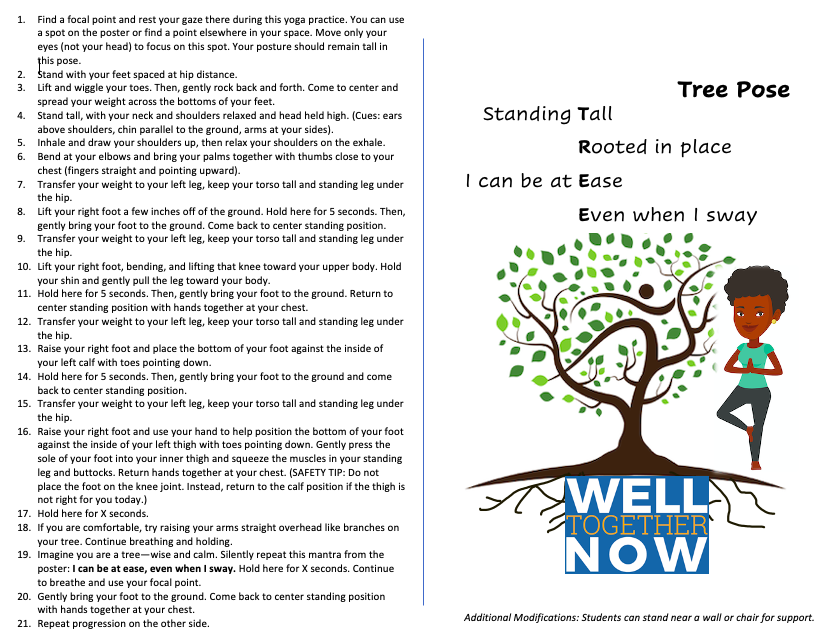
Instructions:
Reminder – Verbally prompt relaxed breath throughout this routine.
- Find a focal point and rest your gaze there during this yoga practice. You can use a spot on the poster or find a point elsewhere in your space. Move only your eyes (not your head) to focus on this spot. Your posture should remain tall in this pose.
- Stand with your feet spaced at hip distance.
- Lift and wiggle your toes. Then, gently rock back and forth. Come to center and spread your weight across the bottoms of your feet.
- Stand tall, with your neck and shoulders relaxed and head held high. (Cues: ears above shoulders, chin parallel to the ground, arms at your sides).
- Inhale and draw your shoulders up, then relax your shoulders on the exhale.
- Bend at your elbows and bring your palms together with thumbs close to your chest (fingers straight and pointing upward).
- Transfer your weight to your left leg, keep your torso tall and standing leg under the hip.
- Lift your right foot a few inches off of the ground. Hold here for 5 seconds. Then, gently bring your foot to the ground. Come back to center standing position.
- Transfer your weight to your left leg, keep your torso tall and standing leg under the hip.
- Lift your right foot, bending, and lifting that knee toward your upper body. Hold your shin and gently pull the leg toward your body.
- Hold here for 5 seconds. Then, gently bring your foot to the ground. Return to center standing position with hands together at your chest.
- Transfer your weight to your left leg, keep your torso tall and standing leg under the hip.
- Raise your right foot and place the bottom of your foot against the inside of your left calf with toes pointing down.
- Hold here for 5 seconds. Then, gently bring your foot to the ground and come back to center standing position.
- Transfer your weight to your left leg, keep your torso tall and standing leg under the hip.
- Raise your right foot and use your hand to help position the bottom of your foot against the inside of your left thigh with toes pointing down. Gently press the sole of your foot into your inner thigh and squeeze the muscles in your standing leg and buttocks. Return hands together at your chest. (SAFETY TIP: Do not place the foot on the knee joint. Instead, return to the calf position if the thigh is not right for you today.)
- Hold here for X seconds.
- If you are comfortable, try raising your arms straight overhead like branches on your tree. Continue breathing and holding.
- Imagine you are a tree—wise and calm. Silently repeat this mantra from the poster: I can be at ease, even when I sway. Hold here for X seconds. Continue to breathe and use your focal point.
- Gently bring your foot to the ground. Come back to center standing position with hands together at your chest.
- Repeat progression on the other side.
Additional Modifications: Students can stand near a wall or chair for support.
Use the button below to download the mini poster for Tree Pose Progression.
Click the subscribe button below to join our mailing list, and the latest WTN posts will be sent directly to your inbox.